How to Synchronize IIT Bombay gpo with Gmail
This post is to demonstrate how to synchronize IIT Bombay internal email with Gmail ID. IIT Bombay provide basic email facility over 3 web-mail interface namely Squirrel-mail, Horde and Iloha mail which are accessible using “gpo.iitb.ac.in“, “imp.iitb.ac.in” and “iloha.iitb.ac.in” respectively. All this web-mail provide complete solution for basic email with 1 or 2GB storage but lacks most of the advance features that Gmail do.
Email synchronization includes two parts
- Sending email using institutional ID from Gmail
- Receiving emails from institutional ID to Gmail ID.
With IIT Bombay internal mail system both of this possible individually in multiple ways. IIT Bombay provides POP, IMAP and SMTP server for this with the following details
| – POP Server: pop.iitb.ac.in Port: 110 – IMAP Server: imap.iitb.ac.in Port: 143 – POPS Server: pop.iitb.ac.in Port: 995 – IMAPS Server: imap.iitb.ac.in Port: 993 – SMTP Server: smtp-auth.iitb.ac.in Port: 25 Auth Method: Normal Passwd, Conn. Security: STARTTLS or TLS |
-
Sending Email from Gmail Using Institutional email: IIT Bombay SMTP server serves this purpose. Setup your gmail to use it as follows
-
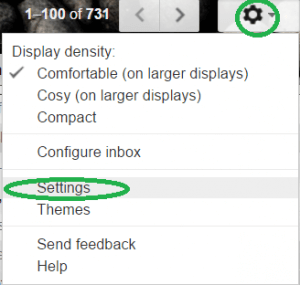
Click settings symbol at Right Top part of Gmail, Chose “Settings” Again
-
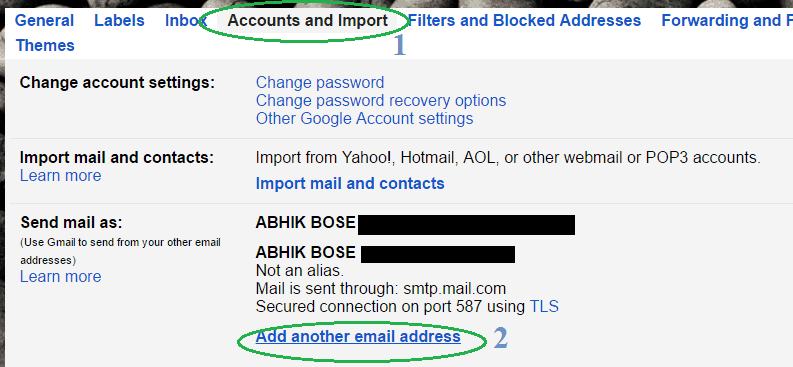
Click “Accounts and Import” then “Add another email address” under the “Send Mail as” Section
-
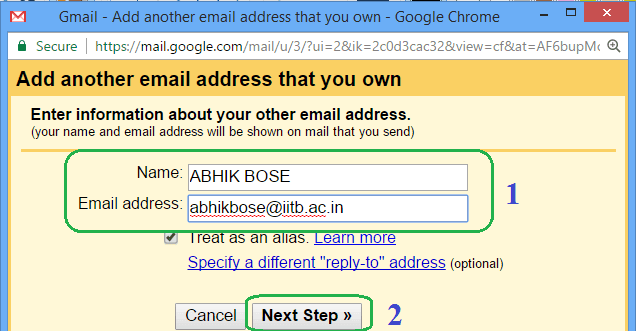
A pop-up window will appear exactly like bellow. Put your name in the “Name” field and IIT Bombay email ID in the “Email address” field then click “Next Step”
-
In Next step Gmail usually auto-configure IIT Bombay SMTP server. You need to put your “LDAP” password only. Please ensure that Gmail has auto-configured the all details correctly as shown bellow, else please correct it manually to SMTP Server: smtp-auth.iitb.ac.in, Port: 25 and tick “Secure connection using TLS” as shown in figure.

-
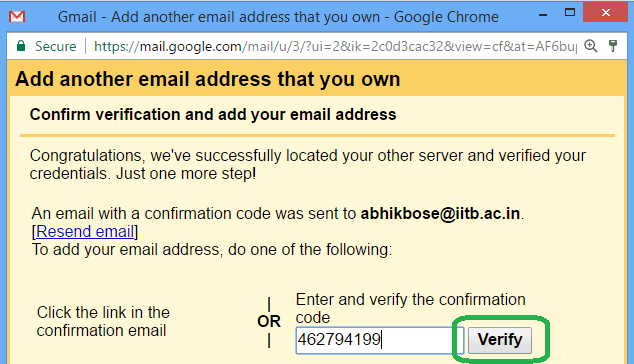
Now Gmail will send a Code to your IIT Bombay email ID to further verify your ownership of that ID. Login to “gpo.iitb.ac.in”, copy paste here the code you’ve received from Gmail. As my experience this code get delayed frequently. You’ll get One more chance to resend the verification Code in the verification window as shown bellow.
-
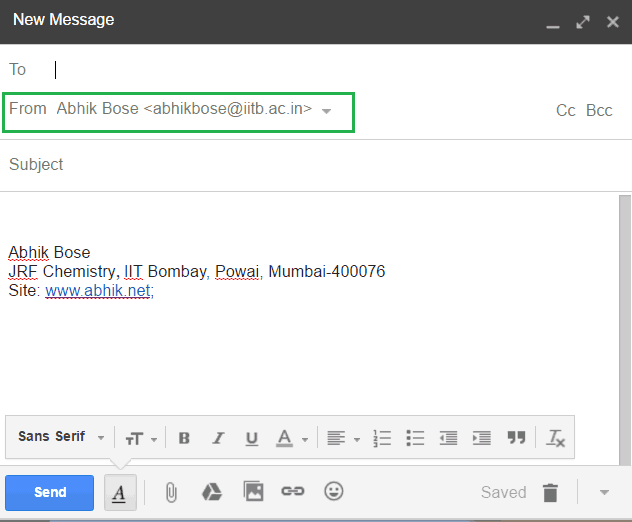
You can now send email using your IIT Bombay ID from your Gmail. Click “Compose” as usual for sending email. While writing receiver email in “To” field you’ll find a new “From” drop down. Select your IIT Bombay ID from the drop down. Compose as usual and send. Your email will now be send from your IIT Bombay email ID instead Gmail ID
-
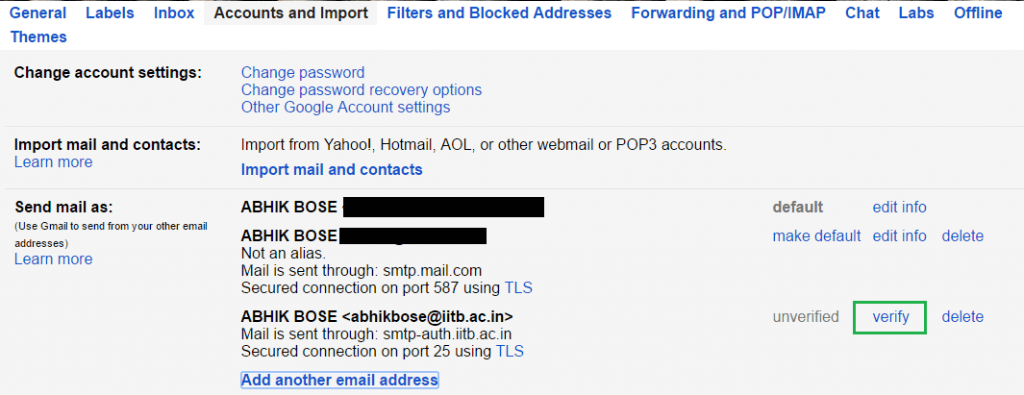
Now if unfortunately you don’t receive the verification code in “step v” for time being please close the window at “step v”. Go back to “Send Mail as” in “Accounts and Import” tab as “Step ii”. You’ll find the newly added email ID as unverified condition. Click verify and follow on screen instruction to resend the verification email once again.
 Important: Please don’t forget to repeat this steps if you change your Institutional email ID or Password
-
-
Receiving IIT Bombay email to Gmail: This can be achieved in two ways. a) Using IIT Bombay Mail Forwarding, b) Using POP3 protocol to fetch emails in IIT Bombay inbox by Gmail
-
IIT Bombay email forwarding: By doing so IIT Bombay server will forward all incoming email to your desired email ID, it may be Gmail or anything else. This is the easiest method for getting incoming email but if you opt for this IIT Bombay will not keep any copy of your email in institutional mailbox. Following is the procedure
-
Open https://camp.iitb.ac.in and click “Log into LDAP System”. Enter your Institutional ID and password and login.
-
Click “Setup AutoForward or AutoReply” under “Change Details” Section.
-
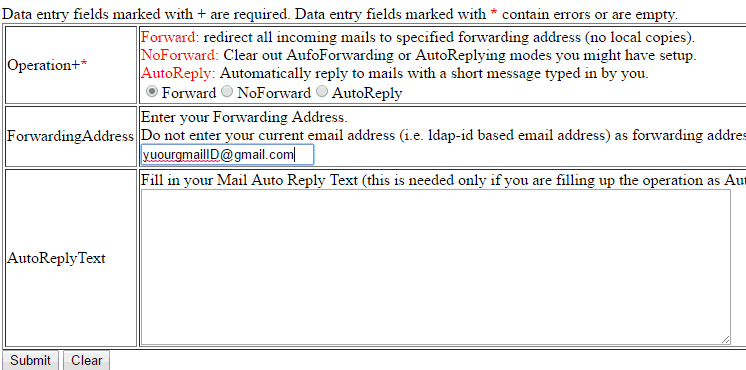
Select “Forward” and enter your Destination email ID in “ForwardingAddress” field, click “Submit”
-
All incoming email will be forwarded to your destination email now. This may takes 10 – 20 minutes to active.
-
If in future you want to Remove this forwarding follow the same procedure till “Step ii” Select “NoForward” in “Step iii” and Submit. Remember One of the three option i.e. “Forward”, “NoForward” and “AutoReply” works simultaneously.
-
NOTE:
-
This will forward email from Current time. If you want to get old emails from your IIT Bombay Inbox to Gmail use the POP method described bellow.
-
NO Local Copy of Incoming email will be in IIT Bombay inbox.
-
You must opt for this option if you want to get incoming email to your institutional ID after passing out of the institute. Else after passing out your institutional ID will be fully removed.
-
-
-
Using POP to Fetch all emails in Institutional Inbox by Gmail: In this process all your old emails in Inbox and subsequent new emails in institutional ID will be copied to gmail. Your emails in IIT Bombay inbox will not be deleted but they will only be marked as read once fetched by Gmail. Only cone is this method is not instantaneous as previous one. Gmail fetch emails once per hour. Remember Gmail fetch email from IITB Bombay Inbox Only, Emails in sent mail or any other folder will not copied. Move them into Inbox before applying this.
-
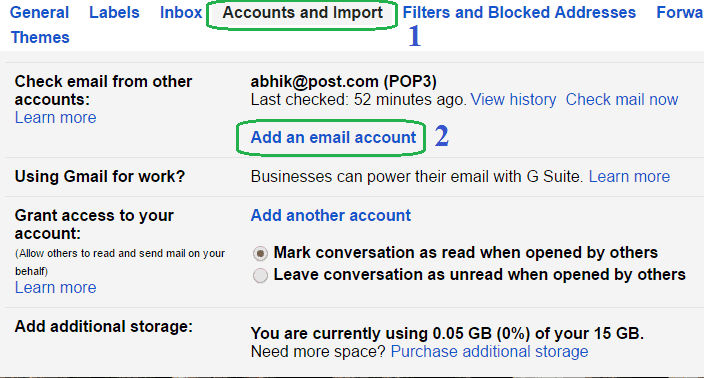
Go to “Accounts and Import” in Gmail as described in “Step 1.i” and “Step 1.ii” of this article. Scroll down a little select “Add an email account” under “Check email from other accounts” section as follows.
-
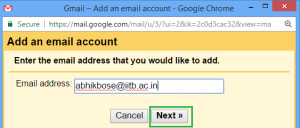
Enter your Institutional ID and click next as follows
-
Select “Import emails from my other account (POP3)” and click Next
-
You’ll get the following. Be careful here.
 Use your institutional Email ID and password. Now
-
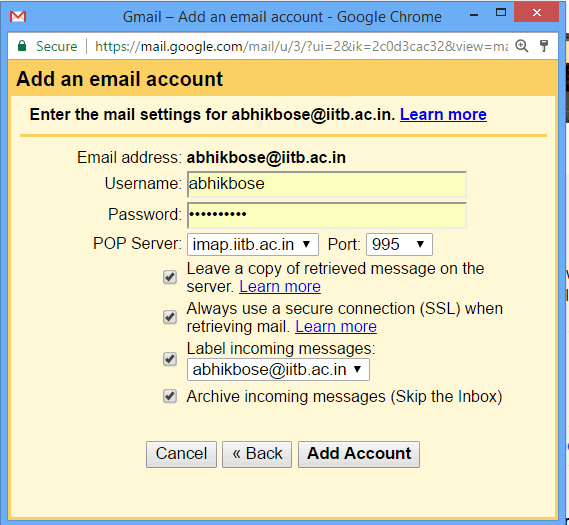
IIT Bombay POP server doesn’t work with Gmail (For past One and half year till today, Don’t know why..!!). You’ve to use IIT Bombay IMAP server “imap.iitb.ac.in” and port 995. Usually this is the default configuration Gmail nowadays providing for IIT Bombay POP. If that’s not with you, please click on drop down select “Other” and enter the above IMAP server details and Port.
-
Must check “Leave a copy of retrieved message on the server” option. Else retrived emails will be deleted from IIT Bombay account
-
Check to use SSL always.
-
Now last two options is up to you. If you Label Incoming messages your messages from IIT Bombay inbox will go in a separate Label (Gmail use Label instead Folder, which looks like folder) along with inbox. Now if you want to keep your inbox clean from thousands of old message Check the last option “Archive incoming messages (Skip the Inbox)”. This will keep fetched emails in selected label only and skip Inbox.
-
Now you may want new emails to be in Inbox after fetching of old emails is over. This is a little tricky. Gmail fetch maximum of ~200 email per hour. It will take time depending on number of email you have in IIT Bombay inbox. Keep checking number of emails in that Label after 1 or 2 hour interval. When fetching of old email will be over number of emails in that folder will no more increase. Now repeat steps from 2.b.i and “Uncheck” the option “Archive incoming messages (Skip the Inbox)” and finish it. Now new emails will start to appear in your Gmail Inbox only. Please keep patience, Gmail sometime takes a little time to start fetching emails.
-
-
-
This Completes synchronizing IIT Bombay email with Gmail. For any question write author to “abhikbose”@”serverlog.net” or “admin”@”serverlog.net” without quotes. All comments are most welcome. ServerLog invites all to contribute here. For more email to admin. Thanks for reading us.
Views: 3438