How to Change IP address in Linux
This post will discuss a step by step procedure of changing, adding and removing IPv4 and IPv6 address in RedHat and Debian based Linux distributions. As most of the server lacks Graphical User Interface only command line methods are configured here. We’ve used “nano” command line editing tools as “root” user. Use your suitable command line editor and prefix “sudo” to commands if you are not “root” but have “sudo” right to edit configuration file, alter and restart network interfaces.
Difficulty: Easy Time Required: Less than 5 minutes
Step 1: Identifying the network interface device
“ifconfig” display all available network interfaces. By default it’s installed, but if not, it must be installed from “base” repository using the following command
CentOS or RHEL
| yum install net-tools |
Debian and Ubuntu
| apt-get install net-tools |
Following is a sample output of ifconfig from CentOS 7.2
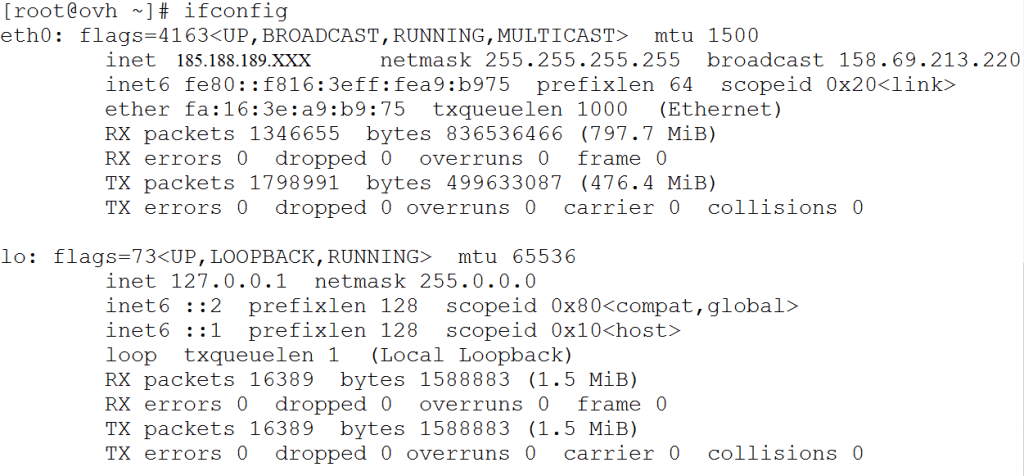
In above configuration currently two network interface devices are present. ”eth0” and ”lo”. The interface “lo” stand for loop back device and act as interface for “localhost” that is t communicate within the device itself. So the primary interface device is “eth0” here. In your case this may be venet0 or anything else.
Step 2: Changing IP address for desired interface. This can be achieved in two different way viz. using shell command or editing configuration file.
- Using Shell Command: This is rather easy method for adding and deleting IP address. Different command line tools like “ifconfig”, “ip addr” may be used. This commands are mostly operating system independent and can be used for both RedHat and Debian based system and for both IPv4 and IPv6 as follows.
- Adding an IP address
ip addr add 192.168.0.101 dev eth0 where 192.168.0.101 is the IPv4 address and eth0 is the interface where you want to add it. Change 192.168.0.101 and eth0 with your ISP supplied IP address and your device name. For IPv6 simply change 192.18.0.101 with your IPv6 address without alteration of any other command.
- Deleting an IP address
ip addr del 192.168.0.101 dev eth0 Where 192.168.0.101 is an IPv4 address present in your system and you want to delete it. Change IP address and device as described for adding.
Problem with this method is those added or deleted IP addresses are not permanent in system and get deleted whenever the network interface is restarted or the system is rebooted
- Adding an IP address
-
Editing Configuration file: A static IP address must be permanently added by editing configuration file. IP address added hence never get deleted on network restart or system reboot. This methods differ from RedHat to Debian based system and both are discussed bellow
- In RedHat and CentOS system: In RedHat and CentOS edit the following configuration file with “root” or “sudo”
nano /etc/sysconfig/network-scripts/ifcfg-eth0 where eth0 is name of the device. For venet0 replace it with ifcfg-venet0. A sample output is like this
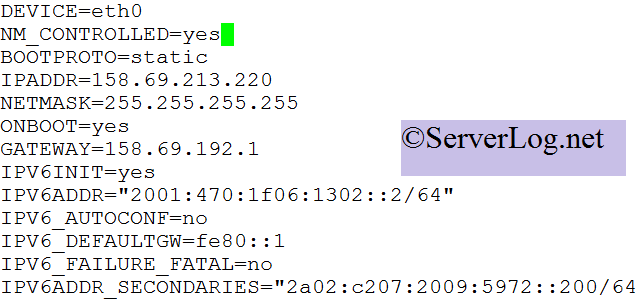
- DEVICE= Device Name, i.e. eth0 here
- NM_CONTROLLED= The device is controlled by Network Manager or not. Keep it yes, else restarting network may not apply changes made on the file
- BOOTPROTO= Options are “dhcp”, “static”. “dhcp” indicated IP address will be auto assigned to the device from ISP’s DHCP server. “static” means manually added static IP address
- IPADDR= This is the persistent static IPv4 address of your system. Change it with your desired IP address to change the IPv4 of your system. Warning: Using an IP address that doesn’t assigned to you by your ISP will break network connectivity.
- ONBOOT= “yes” indicate the device will start on system startup, “no” will do the reverse.
- GATEWAY= IPv4 address of your ISP’s Gateway router (Provided by ISP)
- IPV6INIT=”yes” indicates the Linux kernel will allow IPv6 connectivity for that device. “no” will break IPv6 connectivity for that device.
- IPV6ADDR=””2001:470:1f06:1302::2/64″ indicates the present IPv6 address of the system. Change it with new IPV6 address.
- IPV6_AUTOCONF=”no” indicates IPv6 Gateway will not be auto-configured by system. (I may be wrong here)
- IPV6_DEFAULTGW=”fe80::1″ indicates the IPv6 address of your ISP’s gateway router.
- IPV6_FAILURE_FATAL=”no” indicates if the system is unable to assign that IPv6 address to your device network will continue with IPv4 connectivity. Option “yes” will break network connectivity of the device “eth0” here in case of an IPv6 failure.
- IPV6ADDR_SECONDARIES=”2a02:c207:2009:5972::200/64 2a02:c207:2009:5972::2001/64″ This define multiple extra IPv6 address in the system. Addresses are to be separated by space. And the entire value must be quoted. This is not mandatory for any other values in the configuration file. For outgoing connection system will use the last IPv6 address mentioned in this field, unless otherwise specified by outgoing traffic sending applications configuration file.
Now restart network using the following command to effct the modified configuration file.
service network restart - For Debian and Ubuntu System: The configuration file here is “/etc/network/interfaces”. Edit it as follows
nano /etc/network/interfaces Following is a sample output from Debian 7 system
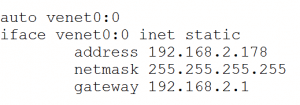
- auto venet0:0 indicate name of the device, here “venet0:0”
- iface venet0:0 inet static: “inet” indicate you are adding an IPv4 address. For IPv6 replace it with “inet6” and start a new “iface” thread for venet0:0. So if you want to add a IPv6 in venet0:0 add the following lines in last of the configuration in picture. [Unfortunately I don’t have a server on hand to generate sample picture with both IPv6 and IPv4 in same interface. (The vps used here for sample picture is OpenVZ virtual box and hence have complex setup)]
iface venet0 inet6 static
address 2a00:1630:66:24b::2478/64gateway fe80::1
where /64 is the subnet mask
Now restart network using the following command to make the change effect
/etc/init.d/networking restart
- In RedHat and CentOS system: In RedHat and CentOS edit the following configuration file with “root” or “sudo”
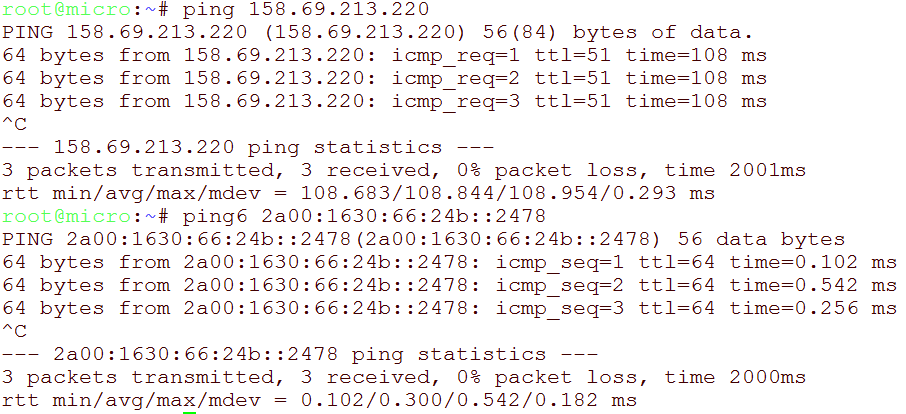
Step 3: Testing the configuration: Use ping and ping6 to check newly added IPv4 and IPv6 address
|
ping 58.69.213.220 ping6 2a00:1630:66:24b::2478 |
If all configurations are correct you will get like following figure
For any confusion or wrong explanation please leave a comment or email to admin at “admin”@”serverlog.net” or write author directly to “authorname”@”serverlog.net”. ServerLog welcome all to write here. For more please mail to Serverlog Admin. Thank you for reading us.
Views: 776