How to install & use Tar command in linux to Preserve file ownership in Archive
 Why It’is special than other archiving tools?
Tar is a common command line tool for archiving files and directories. It’s famous for the capacity of preserving file permission and ownership. Unlike other archiving tools, say zip or gzip, tar itself doesn’t compress files during archive creation. But in conjugation with those tools it create compressed archive with file ownership and permission intact. So this tool fulfill both the purpose with a single command, that’s great about it.
Why This tool is necessary?
- Archiving is necessary to transfer large number of files. It take hours to transfer a wordpress installation over ssh without archiving. With archiving it’s matter of a few minutes.
- Saving permission and ownership is specially useful while transferring an installation between similar system.
Installing Tar in CentOS and Ubuntu like System
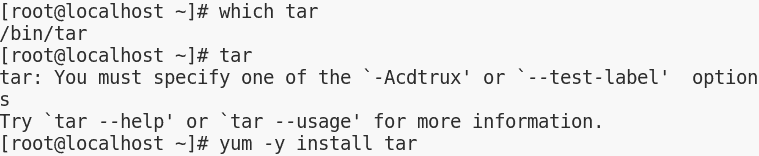
This is usually pre-installed with most of the common Linux distribution. Write “which tar” or just “tar” in command line to check it’s installed or not. Output like “/bin/tar” or the one shown in following figure confirms the tool is installed, no further steps require in that case. Otherwise install it as follows.
For CentOS & RHEL
It’s present in “Base” repository. Use yum to install.
| yum -y install tar |
For Ubuntu and Debian Like system
| apt-get install tar |
Installing accompanying tool gzip, bzip2 and xz for compression
| yum -y install gzip bzip2 xz |
| apt-get -y install gzip bzip2 xz |
Installing from source code
In special circumstance or if you want to make your hand dirty follow this section to install the software from source code. Install developer tools, then download source package of your preferred version from GNU and compile as follows.
To install developer package use the following in CentOS or RHEL system.
| yum groupinstall ‘Development Tools’ |
For Ubuntu or Debian based system use the following. (Code Source)
| sudo apt-get install linux-headers-$(uname -r) build-essential |
The source package comes in form tar-archive itself. So you’ve to extract them in another machine with “tar” installed, and then transfer it. Change current directory into the source package directory then compile and install as follows
| ./configure && make && make install |
Compilation is sometime a tedious job & this is not the preferred of installation in most of the case. If compilation fails at any step please diagnose, rectify the error and try again.
Archiving file and Directories (Without ownership preserved)
Following is the common pattern of archiving file or directory. Tar always preserve file and directory permissions while archiving but not ownership.
| tar -falges archive-file-name source-file-or-folder |
flages: c,v,f,z etc. Archiving and compression nature depends on them, explained latter.
archive-file-name: Name of the archive about to be created with extension.
source-file-or-folder: The file or folder to be archived.
1. Archiving file and directory without compressing
Following will create an archive serverlog.tar from a folder Serverlog located in current directory without any compression. Archiving without compression is extremely fast and useful while compressing lots of very small file, where time is the bottleneck.
| tar -cvf serverlog.tar ./Serverlog |
c: Create Archive
v: Verbose (Display currently archiving file on screen while archiving)
f: Use the archive following it
2. Creating and compressing archive
Use -cvzf or -cvjf to compress with gzip or bzip2 respectively. .tgz and .tar.bz2 is for gzip and bzip2 compression. Extension .tgz is synonymous with tar.gz although extension less important here.
| tar -cvzf serverlog.tgz Serverlog |
| tar -cvjf serverlog.tgz Serverlog |
There was no flag to combine “xz” with tar. Traditional way was piping archive output to “xz” as follows to obtain xz compressed tar-archive.
| tar -cvf – Pictures | xz -9e > pic.tar.xz |
However modern tar can combine with “xz” using -J flga. Note: Capital J is for xz and small j is for bzip2.
| tar -cJvf serverlog.tar.xz Serverlog |
9e is the highest level of compression with xz. For more on tar-xz combination refer here.
Note: bzip2 provide better compression over gzip but consume considerably more time. xz provide best compression in reasonable time consuming excessive CPU resource. Reference
Extracting Archive
The following command will extract an archive in current working directory
| tar -xvzf serverlog.tgz |
x: Extracting
z, j, J: For extracting gzip, bgz or xz file.
To extract an archive to another directory explicitly mention the destination directory following the archive name. Considering both archive and destination is out of current directory use the following.
| tar -xvzf /path-to/serverlog.tgz /path-to-destination-folder/ |
Preserving ownership while archiving
An additional flag p can preserve ownership while archiving with any compression or no compression. But remember, Linux kernel allow superusers to change ownership (Learn More). So, you’ve to“root” or superuser (users with “sudo” privilege) to use this.
| sudo tar -cvpzf serverlog.zip ServerLog |
Use –same-owner as superuser while extraction to retain the ownership
| sudo tar -xvzf –same-owner serverlog.zip /path-to-destination/ |
Summary
We’ve covered installing tar in CentOS and Ubuntu like system using “yum”, “atp-get” & from source code otherwise. c,x,v,z,j,J,f flags represent create, extract, verbose, gzip, bzip2, xz, use archive respectively. Flag p & –same-owner is to preserve ownership during archiving and extraction respectively. For any ambiguity and suggestion please leave your comment bellow.
Views: 823