5 steps to reset root password in RHEL/CentOS 6.x and 7.x -with Images
Introduction
Here you’re because you’ve lost your CentOS or RHEL root password. OMG..!! Don’t be scared, we’ll demonstrate how to reset that step wise with Image. Both RHEL/CentOS 6.x and 7.x is covered. The basic is editing the kernel before booting to force the system to start in single user mode. Then system will provide you with shell access as root. After that it’s really easy to reset root password
Difficulty: Easy Time Require: Less than 5 minutes
Prerequisites
- A server with CentOS or RHEL 6x or 7x installed
- You must have access to boot-loader screen (The black screen comes before operating system starts booting)
As we already mentioned you’ll need to edit kernel before booting. This is absolutely necessary. So, this tutorial can’t be followed over SSH. Most of the hosting provider provides some short of VNC or KVM over IP access to access boot-loader screen of remote server. For remote dedicated server or VPS without such access, there is other way to reset root password, but this article is not about that.
Disclaimer: We’ve used 2 VPS for Demonstration. A locally hosted VPS in Oracle Virtual Box with CentOS 6.8 final and a remote VPS with VNC console access with CentOS 7.3 installed.
Resetting root password of RHEL/CentOS 6x or 7x
Step 1: Reboot your server
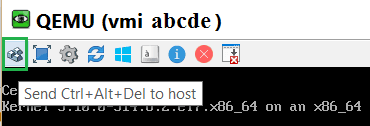
Start with rebooting your server. If it’s a local server use reboot button. If a remote server over VNC send and alt+ctrl+del signal. For KVM/IP or IPMI you can restart the server with restart button much like a local server. If you are using VNC with TigerVNC viewer refer the following figure to reboot.
Step 2: Stop the automatic booting
CentOS/RHEL 6.x
Press any key at just start up to stop automatic botting. System shows the following screen for 5 seconds while pressing any key stops automatic booting.

[Note: In this stage if you’re over serial VNC, KVM/IP or IPMI use virtual keyboard of the respective console. Pressing physical keyboard from local system doesn’t work sometime]
CentOS/RHEL 7.x
For CentOS 7, instead of above screen, versions a list of available kernel is displayed during system boot. Press any key to stop automatic boot and proceed to Step 3.
Step 3: Select the desired kernel to edit
CentOS/RHEL 6.x
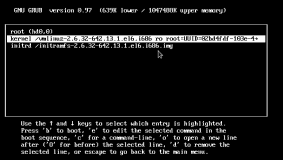
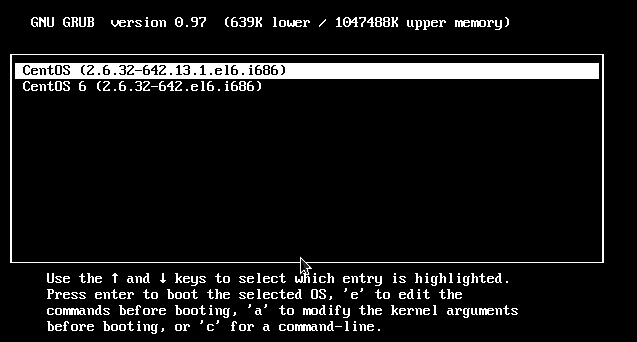
Now a list of all installed kernel will appear as follows. Select any one and press e to edit it. By default the latest kernel is selected. So you may just press e to proceed editing the latest kernel.
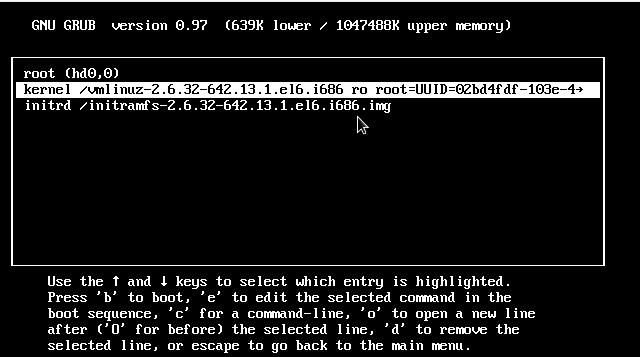
From the next screen press down arrow to select the item named “kernel /….some other text…” and again press e to edit. (Usually kernel remains in the second option) .
CentOS/RHEL 7.x
After stopping the automatic boot by pressing a key select any Kernel from the list and press e to edit.

Step 4: Edit the desired kernel
This step is a little bit different for CentOS/RHEL 6x and CentOS/RHEL 7x. So here we’ve mentioned them separately.
CentOS/RHEL 6x
After the last step following text will appear in the screen. Edit it with a space and then 1 after quit as follows.
| Original Text: <6 crashkernel=auto rd_NO_LVM rd_NO_DM rhgb quit |
| Change it to: <6 crashkernel=auto rd_NO_LVM rd_NO_DM rhgb quit 1 |
Note: In your case the test may be a little different. Don’t panic, just add a ” 1″ [space then ‘1’] after quit.
Look at the screenshot for reference


Now press enter, the following screen will appear. Again press enter to boot with the edited kernel

CentOS or RHEL 7x:
The procedure is quite similar with CentOS or RHEL 6x, but here the kernel looks quite different and you’ve to edit is accordingly. Please look at the kernel in the following figure.
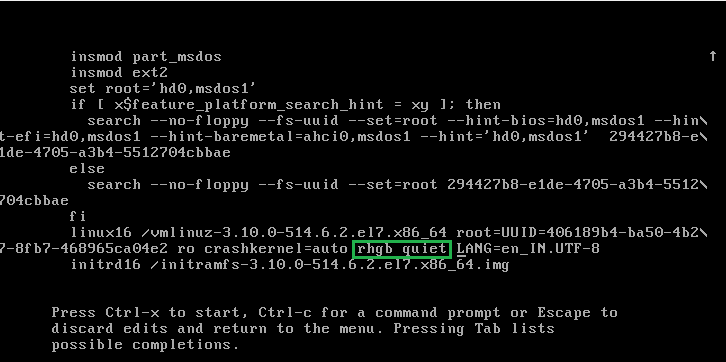
Depending on screen resolution the full kernel may not come in single screen. Press down arrow to select “rhgb quiet” delete it and replace with “init=/bin/bash”
|
Original: rhgb quiet Replace with: init=/bin/bash |
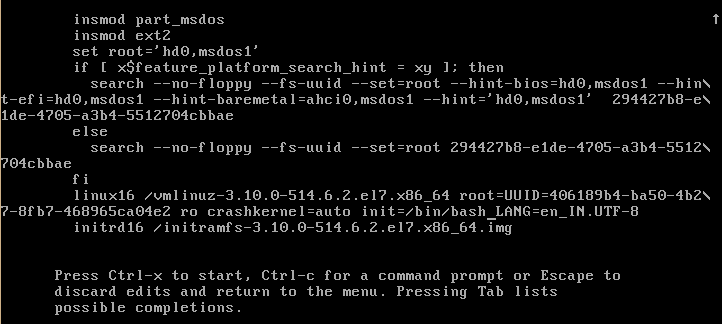
Press Ctrl-x to boot using this kernel and proceed to next step
Step 5: Reset root password and reboot
CentOS/RHEL 6.x
The above process will start your system in “Single User Mode” with the user ‘root’ logged in. Now use ‘passwd’ command to reset ‘root’ password.
|
passwd Enter New Password Re-Enter new password |
Now reboot your system with ‘reboot’ command to effect the new password.

From next time onward you can log in as usual with your new root password
CentOS/RHEL 7.3
With this edit operating system mount disks in read only mode. First make them read-write only with the following command
| mount -o remount,rw / |
Now use ‘passwd’ command to reset root password as follows
|
passwd Enter New Password Re-Enter new password |
Finally, use the following command to start the system in normal mode
| exec /sbin/init |
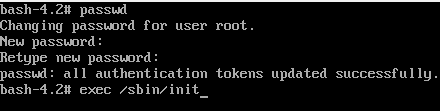
Now you can log in with your new password as usual.
Note: You needn’t to edit back the kernel to it’s original state. After reboot the kernel will be restored automatically.
This finishes resetting root password in RHEL/CentOS both 6x and 7x version. For any suggestions or if you’ve faced any difficulty while following our tutorial please comment with the exact problem you’ve faced. We’re ready to help you. Thanks for reading.
Views: 12427